
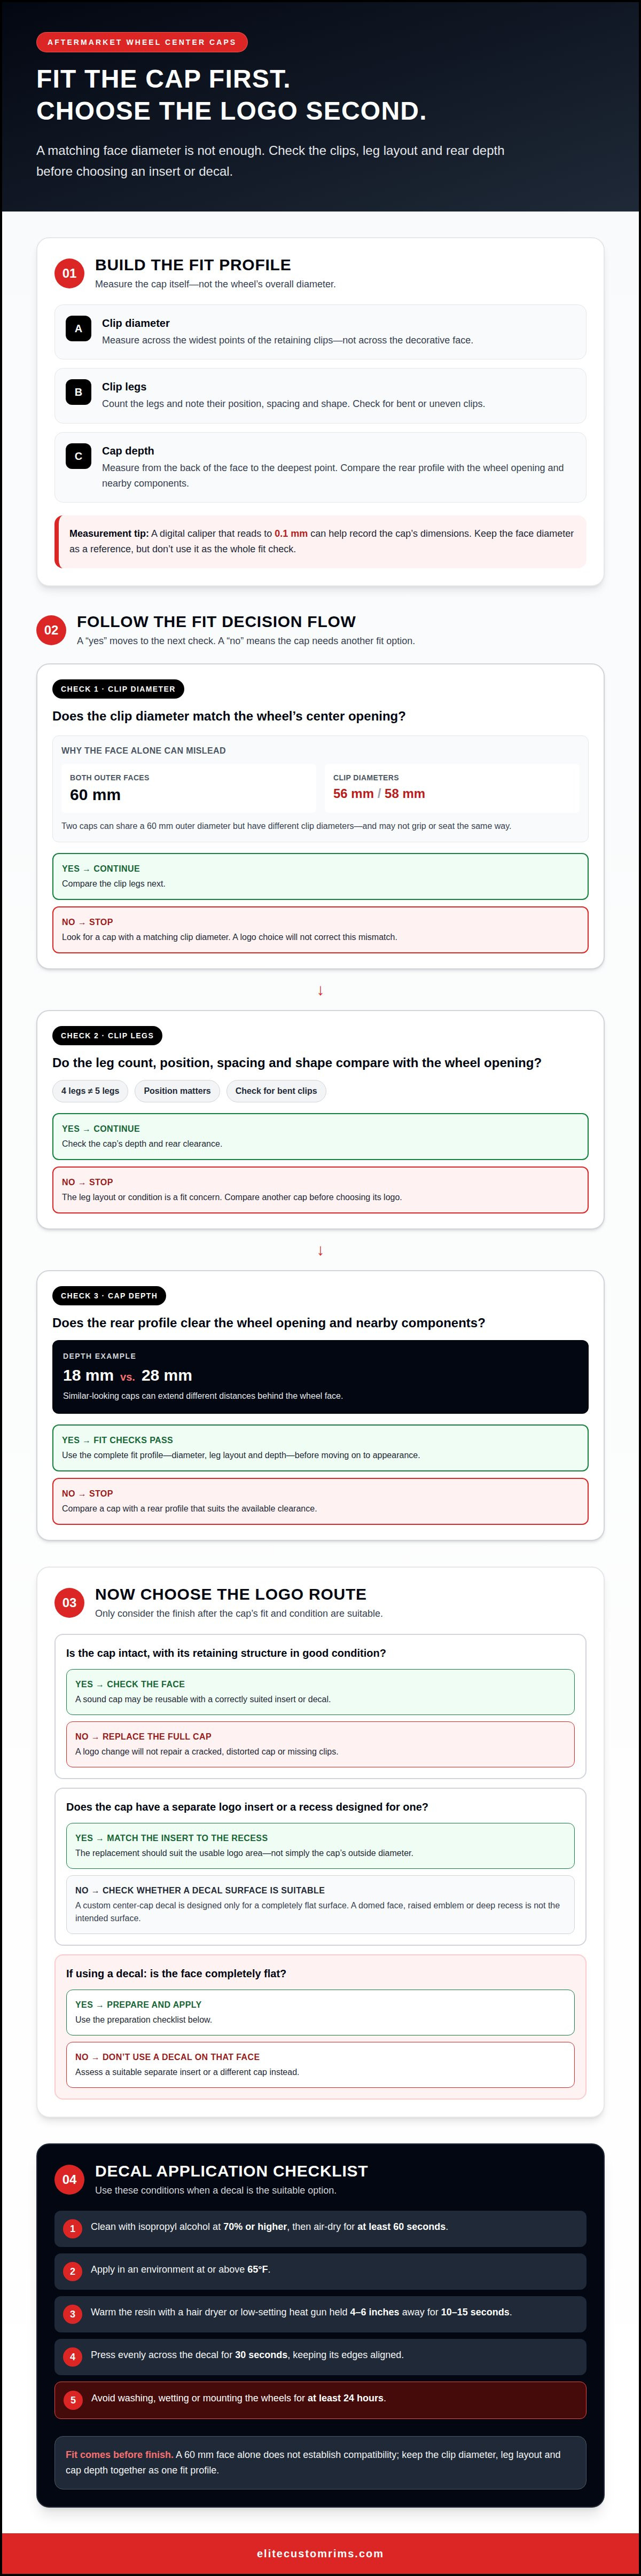
The face diameter alone won’t tell you whether a center cap fits. Matching center cap logos for aftermarket wheels starts with measuring the clip diameter, counting the clip legs, and measuring the cap’s depth behind its face. Match these fit dimensions before choosing a logo.
It’s easy to focus on the visible face, but caps with the same outer diameter can have different fittings. For example, two caps with a 60 mm outer diameter could have clip diameters of 56 mm and 58 mm, and different depths behind the face. A close visual match isn’t enough if the clips or depth don’t line up.
This guide explains what center caps do and how to measure clip diameter, clip legs, and cap depth to narrow down the right fit. You’ll also learn how these measurements distinguish look-alike caps and why fit comes before the finishing logo. A few careful measurements make the options clearer and help bring the wheel’s final look together.
Key Takeaways
- Understand how a center cap differs from a full wheel cover, and why cap fit is measured in millimeters.
- Measure the clip diameter, count the clip legs, and compare the cap’s depth to assess fit beyond the visible face.
- Learn when replacing just the logo insert may work, including why the cap’s face shape matters.
- See how fit and design choices shape the options for finishing your aftermarket wheels with a coordinated logo.
What is a wheel center cap, and what does it do?
A wheel center cap covers the central wheel opening and completes the wheel’s appearance. It can also shield the exposed hub area from road grime. Unlike a full wheel cover, sized by wheel diameter, such as 14-, 15-, or 16-inch, a center cap is described by its diameter in millimeters.
That difference matters when replacing a cap or choosing a logo insert. The wheel’s overall diameter doesn’t tell you the cap’s fit. Measure the cap itself, ideally with a digital caliper that reads to 0.1 mm. Record the face diameter, then inspect the back for retaining clips and the space needed behind the face. A face that looks right can still have incompatible fittings.
If an aftermarket cap is discontinued, look for a replacement cap with matching fit dimensions, or replace the cap rather than the logo alone. An OEM logo isn’t automatically free to use on an aftermarket cap. According to the USPTO, trademarks identify the source of goods and help buyers distinguish brands; use OEM branding only with authorization.
To make a custom logo, choose an insert or decal sized for the cap’s usable face. Custom center-cap decals are designed only for completely flat surfaces. Clean the surface with isopropyl alcohol at 70% or higher, then let it air-dry for at least 60 seconds before applying the decal.
For removal, use a suitable cap-removal tool and ease the cap out without levering against the wheel’s finished face. To install it, align the retaining clips and press evenly until the cap sits flush. Coordinate the look by comparing the logo’s color and finish with the wheel, then choose a design that complements its spoke shape and overall style. A restrained logo can keep a polished wheel looking cohesive, while a contrasting color can make the center stand out.
Clip diameter, clip legs, and cap depth
A cap’s outer face can match the wheel opening and still fail to fit. The retaining clips and rear profile determine how it seats. Compare three measurements: clip diameter, the number and arrangement of clip legs, and cap depth behind the face. Treat them as one fit profile, not interchangeable details. Together, these measurements help narrow down options for matching center cap logos for aftermarket wheels.
Measure clip diameter across the retaining clips, not across the decorative face. For example, two caps can share a 60 mm outer diameter while having clip diameters of 56 mm and 58 mm. That difference can keep one cap from gripping securely or prevent it from seating. Record the measurement at the widest points of the clip assembly. A logo choice won’t correct a mismatch in this fitting dimension.
Next, inspect the back and count the clip legs. A cap with 4 legs differs from one with 5, and leg position matters too. Compare their spacing and shape against the wheel’s center opening. Bent or uneven clips can also change how a cap sits, so a simple leg count isn’t the whole fit check. This detail helps distinguish caps that look alike from viable options for matching center cap logos for aftermarket wheels.
- Clip diameter: Measure across the widest points of the retaining clips.
- Clip legs: Count each leg and note its position around the rear.
- Cap depth: Measure from the back of the face to the deepest point.
Depth prevents a less visible mismatch. Two caps may have similar faces and clip diameters, but one can extend farther behind the wheel face. For example, depths of 18 mm and 28 mm can produce different clearances. Compare the rear profile with the wheel opening, especially if components sit close behind the cap.
Keep all three results together when assessing fit. A 60 mm face alone doesn’t establish compatibility; the clip diameter, leg layout, and depth complete the picture. Use that full profile to guide matching center cap logos for aftermarket wheels, so the selected cap fits before you focus on its appearance.
Can I replace just the logo insert in an aftermarket wheel center cap?
Yes, if the cap is intact and designed to accept a separate insert or decal. That can refresh a worn logo without replacing the cap’s retaining structure. If the cap is cracked, distorted, or missing clips, changing only the logo won’t fix its condition or how it seats. First decide whether the cap is still suitable for reuse.
Identify how the cap face accepts a logo. A separate insert fits a designed recess, while a decal adheres to the cap surface. These options aren’t interchangeable. Custom center-cap decals are designed only for completely flat surfaces. A domed face, raised emblem, or deep recess won’t provide the intended surface. Match the replacement’s shape to the actual logo area, not the cap’s outside diameter. This is the starting point for matching center cap logos for aftermarket wheels.
For a decal, prepare the surface with isopropyl alcohol at 70% or higher, then let it air-dry for at least 60 seconds. Apply it in an environment at or above 65°F. Warm the resin with a hair dryer or low-setting heat gun held 4-6 inches from the decal for 10-15 seconds. Press evenly across the decal for 30 seconds, keeping its edges aligned.
After application, avoid washing, wetting, or mounting the wheels for at least 24 hours. Plan the application before the caps go back onto the vehicle. This pause helps protect the finished decal from immediate water exposure and handling.
- Replace only the insert when the cap is sound and has a separate logo piece.
- Use a decal when its design suits a completely flat face.
- Replace the full cap when damage affects the body or retaining clips.
Before choosing artwork, compare its visible size with the usable face and keep it centered. A correctly sized design can still look crowded if its border sits close to the cap’s edge. For matching center cap logos for aftermarket wheels, choose a style that suits both the face and the wheel’s overall appearance. The best results come from considering the logo method and cap construction together.
How much do aftermarket wheel center caps and custom logo inserts cost?
The price depends on what you’re replacing. A logo decal, a separate insert, and a complete center cap are different purchases. That figure covers decals, not replacement caps or standalone inserts.
Logo color can affect the decal total. Decide whether the finish suits the wheel before choosing it. A bright chrome emblem can stand out against a dark center, while a restrained finish can keep a similar-colored wheel visually balanced.
For a full replacement, fit remains the deciding factor. A cap must match the wheel opening and its rear fittings, so the cost depends on whether you need a cap, an insert, or only a decal. For example, an intact cap with a flat face may need only a decal, while a damaged cap may need replacing. Don’t mistake a decal-set price for the price of a complete cap.
Compare what each purchase includes before weighing totals. Check whether the amount covers one piece or a set, whether it includes the cap or only the logo, and how shipping is handled. For the decal set above, shipping is calculated at checkout.
- Shipping: Calculated at checkout for the decal set.
Choose the replacement type first, then compare its fit and finish with the wheel. If a wheel upgrade is also part of your plan, explore wheel options to coordinate the overall look.
Elite Custom Rims
Elite Custom Rims offers wheels for Audi, Chevy/GMC, Mercedes, and Porsche vehicles. If you’re planning a wheel change, consider center-cap fit alongside the wheel’s design. The cap’s clip profile and depth need to suit the wheel, while its logo and finish complete the look.
Explore Elite Custom Rims’ wheel options for these vehicle brands as you plan your selection. Your wheel choice is a starting point for coordinating the center cap’s appearance and checking its fit dimensions. Keep this guide’s measurements handy as you narrow down your options.
For help choosing wheels, contact Elite Custom Rims.
Set a Clear Direction for Your Wheel Upgrade
Before choosing a logo, decide what you want the finished wheel to express: a factory-inspired look, subtle personalization, or a distinctive focal point. That design goal gives you a practical filter for comparing emblems, finishes, and overall visual balance. A considered approach to matching center cap logos for aftermarket wheels starts with your intention, not the logo alone.
Consider the wheel and center cap as one design choice. A logo that looks appealing by itself may feel out of place once paired with the wheel. Think about how the vehicle’s existing details, such as its trim and body color, contribute to the look you want. Then choose a style you’ll be happy to see whenever you approach the car.
If a wheel upgrade is part of that plan, contact Elite Custom Rims to discuss your wheel options. Make your next choice with a clear vision, and let the details come together around it.
Frequently Asked Questions
How do you measure a center cap?
Measure the cap off the wheel, keeping the caliper jaws level across opposite edges of its face. Rotate the cap and take another reading, since damage or uneven wear can affect the result. Record the face diameter separately from the rear retaining dimensions. This prevents a visible-face measurement from being mistaken for the size or profile that determines how the cap attaches.
How do I find the correct center cap size for aftermarket wheels?
Match the cap’s measurements to the wheel’s center opening and retaining design instead of relying on wheel diameter or vehicle make alone. Look for a brand, model, or part identifier on the wheel or cap to narrow your search. If the cap is missing, identify the wheel first, then compare its center opening with the replacement cap’s fit profile.
How do I identify the center cap type and mounting style for my wheels?
Inspect the cap’s rear and the wheel opening to see how the cap attaches. Retaining legs indicate a clip-mounted design; visible threaded points or separate hardware indicate a fastened style. Also check whether the logo is a separate insert, a surface decal, or part of the cap itself. These details help distinguish a logo-only replacement from a complete-cap replacement.